Ubuntu Server Setup Part 8 - Sending Email Through Gmail
30 Oct 2018- Part 1 - Logging In
- Part 2 - Securing Login
- Part 3 - Installing a Firewall
- Part 4 - Setup Nginx Web Server
- Part 5 - Install Git, Ruby and Jekyll
- Part 6 - HTTPS With Let’s Encrypt
- Part 7 - Email Forwarding with Postfix
- Part 9 - Setup a Reverse Proxy with Nginx
- Part 10 - Install Docker and Docker Compose
In the previous part we covered how to setup Postfix to receive emails for our custom domain name and forward them onto a personal Gmail account. With that solution, you can get access to all incoming mail via the forwarding, but you have no way of sending mail as owner of your domain.
You could still add the address as a Send Mail As option within Gmail, but your underlying address would still be visible to the receiver. This is also how you see the Sent on Behalf Of message in Outlook etc. Ideally, we want to be able to send email in Gmail, but use our server as an intermediate. This is great because we can still use the Gmail interface and tooling without having to setup a real mailbox (Roundcube etc) on our server.
Securing a Relay
To get the functionality mentioned above, we have to setup Postfix as a relay server (a server that will send e-mails to their destination on behalf of it). You might have heard that relay servers are a really bad idea, and they are, but only if they are open (a.k.a unsecured). In this case, we will be making a relay, but securing it with TLS and a username/password to make sure that all communication between it and Gmail is secured. This will also prevent bad actors from being able to send email on your behalf via your server.
Install Cyrus SASL
We will be using Cyrus SASL as the method of authentication for Postfix. In this case, we will be storing it as a simple (permissioned) database file, however other more sophisticated storage solutions are available such as MySQL and PAM. Install the package using the following command:
$ sudo apt-get install sasl2-bin libsasl2-modules
Create a username and password
Once installed, we can create a username and password combination:
$ sudo saslpasswd2 -c -u yourdomain.com smtp
This will create a database file in the default location /etc/sasldb2 with a single user called smtp (you can use whatever username). You can verify that the user is created properly by running:
$ sudo sasldblistusers2
Make sure that the newly created database file is properly permissioned - in this case only readable by the Postfix user:
$ sudo chmod 400 /etc/sasldb2
$ sudo chown postfix /etc/sasldb2
Create an SSL Certificate
Because all traffic between Gmail and our server will be sent under TLS, we need an SSL certificate. If you already have a certificate (e.g from Let’s Encrypt), you can use that, but otherwise a simple self signed cert works just as well:
$ openssl req -x509 -newkey rsa:4096 -keyout key.pem -out cert.pem -nodes -days 3650
When prompted, enter you domain name yourdomain.com as the Common Name. The cert.pem file is what we are interested in. Makes sure to protect the key file! Now move the generated pem file so Postfix can read it:
$ sudo mv cert.pem /etc/postfix/cert.pem
$ sudo chmod 400 /etc/postfix/cert.pem
$ sudo chown postfix /etc/postfix/cert.pem
Setup Postfix as a Relay Server
/etc/postfix/master.cf
Now we need to change some configuration to setup Postfix as a relay server which can send mail on behalf of another server. Open up the main config file /etc/postfix/master.cf. Uncomment the lines starting with submission and edit them to match the following:
submission inet n       -       n       -       -       smtpd
  -o syslog_name=postfix/submission
  -o smtpd_tls_security_level=encrypt
  -o smtpd_tls_cert_file=/etc/postfix/cert.pem
  -o smtpd_sasl_auth_enable=yes
  -o smtpd_reject_unlisted_recipient=no
  -o smtpd_relay_restrictions=permit_sasl_authenticated,reject
  -o milter_macro_daemon_name=ORIGINATING
Here, we are enabling authentication using SASL and setting up TLS pointing to the new certificate. All traffic to the server must be sent under TLS as to be accepted by the relay. We also specify that we wish to accept relay traffic which is authenticated under SASL, and reject anything else (no open relay here).
/etc/postfix/sasl/smtpd.conf
We also need to tell Cyrus SASL to use the database file we created for authentication. Create the file /etc/postfix/sasl/smtpd.conf and enter the following:
pwcheck_method: auxprop
auxprop_plugin: sasldb
mech_list: PLAIN LOGIN CRAM-MD5 DIGEST-MD5 NTLM
log_level: 7
Once you have made these changes, restart Postfix:
$ sudo service postfix restart
Add Firewall Rule
If everything went well and Postfix started correctly (check the logs if not), Postfix should be listening on port 587 for secured SMTP traffic. You should check the Postfix logs at /var/log/mail.log (or with journalctl -u postfix if using Systemd) if you have any problems. Add a firewall rule to allow traffic through the port:
$ ufw allow 587/tcp
Configure Gmail
Now all the server side configuration is done, time to setup your personal Gmail account to be able to send mail as your domain, using your server as a relay.
Open up Gmail and go to Settings -> Accounts and Import -> Send mail as. Click on the button to Add another email address:
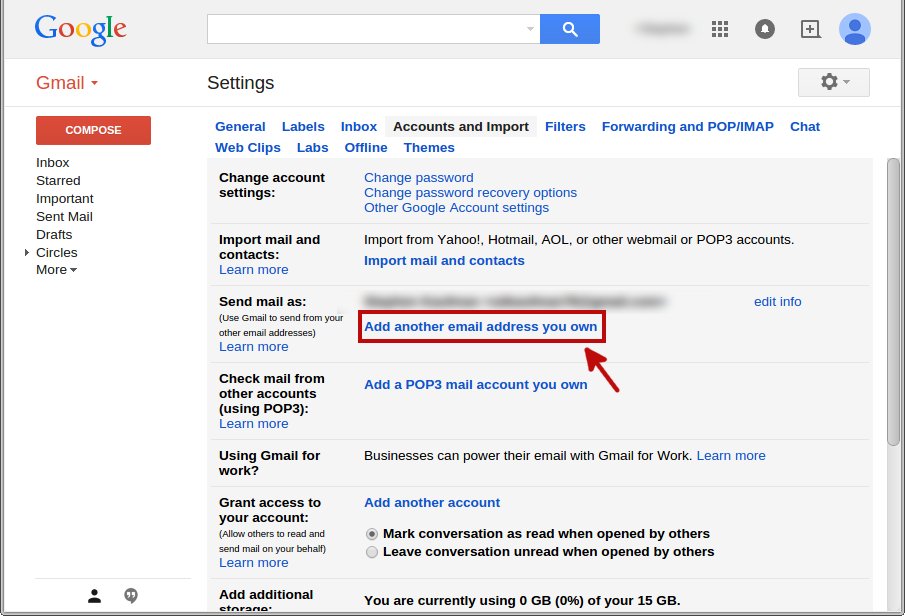
In the dialog box that pops up, enter your name and the full email address you wish to assign e.g [email protected]. Make sure the option to Treat as an alias is checked:

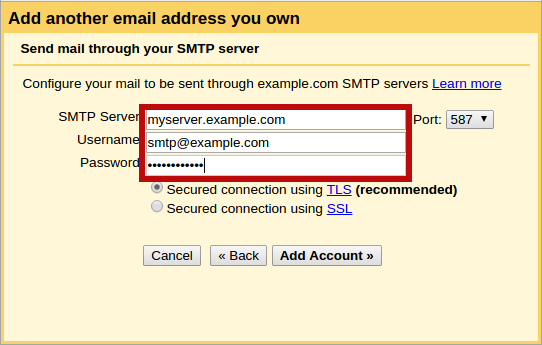
In the next dialog, specify the address of your server and the username and password that was setup with saslpasswd2:
SMTP Server = yourdomain.com
Username = [email protected] (or whatever username you picked) followed by the domain
Password = the password you chose when setting up Cyrus SASL
Make sure that port 587 is selected and the connection is secured under TLS:
If all went well, Gmail should be able to connect to your server and will send a confirmation email to your new address [email protected]. Because we setup forwarding in the previous section, this email should appear in your Gmail inbox as well. Open the mail and copy/paste the confirmation code.
Send mail as
Finally, start composing a new email or reply to an existing one and you should be able to select the new mail address [email protected] in the From dropdown. All done!
Wrap Up
In the last two sections we set up a Postfix email server for own domain name yourdomain.com:
- All emails sent to
[email protected](or any listed in thevirtualfile) on port25, will be forwarded on to[email protected]and be visible in your standard Gmail inbox. - Gmail will let you select
[email protected]as theFromaddress when sending or replying to any mail. The message will be relayed onto our Postfix server withTLSon port587and then passed on to the destination. Any message sent in this fashion will look to the receiver as though it was sent directly by your domain and your underlying Gmail address will not be visible.