Ubuntu Server Setup Part 2 - Secure Login
11 Mar 2018- Part 1 - Logging In
- Part 3 - Installing a Firewall
- Part 4 - Setup Nginx Web Server
- Part 5 - Install Git, Ruby and Jekyll
- Part 6 - HTTPS With Let’s Encrypt
- Part 7 - Email Forwarding with Postfix
- Part 8 - Sending Email Through Gmail
- Part 9 - Setup a Reverse Proxy with Nginx
- Part 10 - Install Docker and Docker Compose
Before reading this, make sure to go over part 1 which covers initial login and setting up a new user.
In the previous section we covered logging into the server with the root user. At that point we were using a simple password, which is less than ideal. In this part we will be setting up public key authentication for the new user in order to better secure our logins. Login to the root user will be disabled via ssh as well, forcing you to go through your newly created user and use sudo commands to get root access.
Generating an RSA public/private keypair
Using Windows you can use the free PuTTygen utility which is bundled in with PuTTY.
Open the app and select SSH-2 RSA under the Key menu. Then hit Generate and provide some mouse movements to generate some randomness.
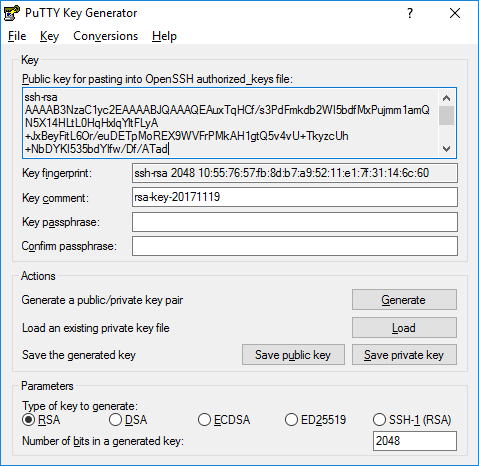
The top textbox will contain the newly generated public key which will be deployed onto the remote server. Save both the public key and private keys in a safe place. Remember you never want to give anyone/anything your private key.
The utility will save the private key in the .ppk format which PuTTY can understand. You can choose to export into the more generic OpenSSH format if needed (e.g to use with the ssh command under WSL).
Copy the contents of the top textbox into the clipboard as this will be what will be saved into the remote server in order to authorise you.
If you are using Linux you can use the ssh-keygen command instead to generate the keys.
Installing the public key
Login to the remote server under the new user you wish to secure (currently using a password although we will now change that).
If you are still the root user run su - <user>
In the home directory create a new .ssh directory which will house the public key.
$ mkdir ~/.ssh
Change the permissions to ensure that only the user can read or write to the directory.
$ chmod 700 ~/.ssh
Create a new file called authorized_keys and open using the nano editor
$ nano .ssh/authorized_keys
Paste your public key into this file. Ctrl+X and then Y to save and exit
Change the permissions on the new key file so again only the current user can read or write to it.
$ chmod 600 ~/.ssh/authorized_keys
Login using public key authentication
Now the public key is installed onto the server and you have the corresponding private key on your local machine, it’s time to login using them. In PuTTY, go to the Connection -> Data -> Auth tab and navigate to the .ppk private key in the bottom field:

If you’re using the ssh command, place the file under ~/.ssh/id_rsa and it will use it automatically. Otherwise you can pass in the path to the private key as you login:
$ ssh -i ~/.ssh/private_key [email protected]
Disable root login
In order to further secure the server, it’s best to prevent direct login to the root user. I have also changed the port for ssh to something other than 22 to prevent a lot of automated attacks and disabled password authentication (forcing you to use public keys).
$ nano /etc/ssh/sshd_config

PermitRootLogin no
Port 23401
PasswordAuthentication no
AllowUsers Fred Wilma
Reload the ssh daemon to reflect the changes
$ sudo systemctl reload sshd
With these settings active, you will be forced into logging in via the Fred or Wilma users (root being disabled) by public key authentication on port 23401.