Automate Jekyll with GitHub Webhooks
05 Jul 2018In the ongoing task of trying to automate as much of the blogging process as much as possible, actually rebuilding the static files is the most painful and could definitely use improvement. If you’re not using something like GitHub Pages (which does it automatically), but instead host everything on your own server, rebuilding the site after you add a new post could involve manually ssh’ing into the machine and running the Jekyll command manually.
That gets old and fast. Ideally you want a similar experience to GitHub Pages in that everything will happen as soon as you push your changes to the repo. If you have control over the VPS which is hosting everything, and can install a simple endpoint in Python/whatever, combined with webhooks you can get the exact same behaviour.
Create a GitHub Webhook
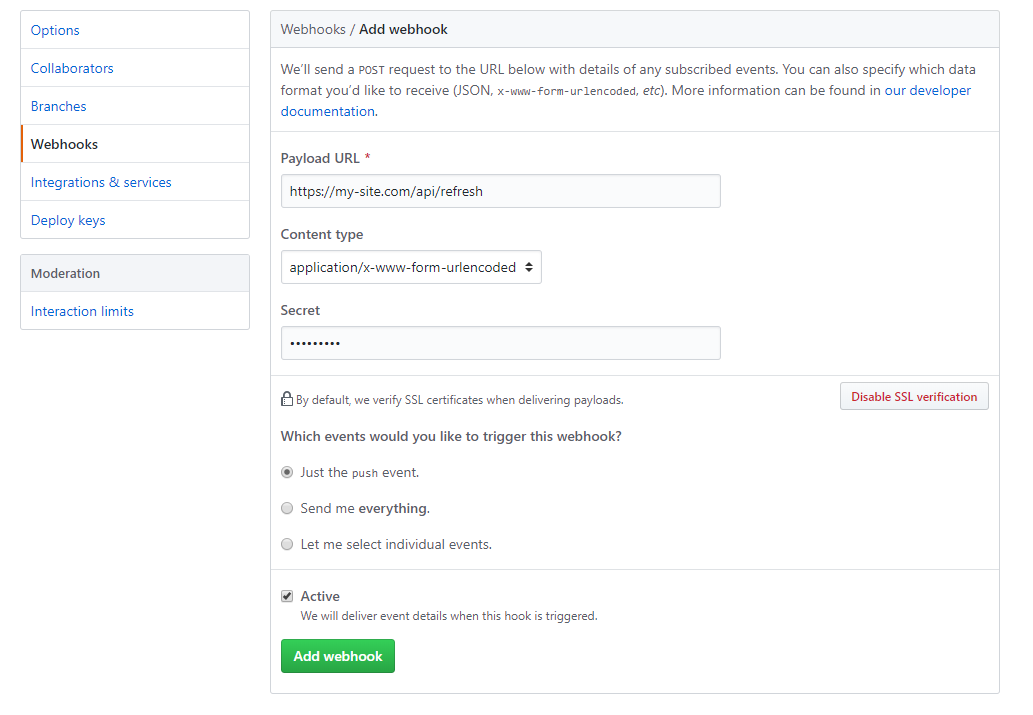
If your site is hosted on GitHub (presumably other providers have something similar), go into your Repo -> Settings -> Webhooks and click on Add Webhook.

Here you can choose a URL which will be called by GitHub when certain actions happen (if you choose the ‘let me select’ option you can see the comprehensive list). In this case we are going to install a simple endpoint on our blog server, which when called will rebuild the Jekyll blog and redeploy.
For this use case we are just interested in the push event (i.e when you push a new post), but you could also perform actions on all sorts of other events if needed. In the content type I have left it as form-urlencoded as I’m not really interested in the payload, but you could also choose JSON if needed. The payload will include extra details of the event - in this case the files which have changed as a result of the git push. This could be helpful if you only wanted to regenerate certain portions of your site if they have been modified.
You can also provide a secret - of which the SHA-1 hash which will be added into the X-Hub-Signature header of each request. More details in the docs. Once finished click Add webook.
Note - GitHub webhooks have a timeout of 10 seconds so you might see them fail if your blog takes longer to rebuild. It doesn’t really matter though as the server will have still been notified.
Add a Flask Endpoint
Now a webhook is set up that will ping our server every time something is pushed to the repo, we have to install something to handle that request and cause a Jekyll rebuild. There is a sea of lightweight web frameworks available these days, in this case I’m going to use Python and Flask (mainly due to the fact that Python is already installed on Debian based servers). On your server run the following to install Flask:
$ pip install Flask
Now we can create a simple endpoint mapped to the request we specified in the webhook config:
from flask import Flask
import subprocess

app = Flask(__name__)

@app.route('/api/blogrefresh', methods=['POST'])
def blogrefresh():
    script_path = "~/bin/jekyll_rebuild.sh"
    subprocess.call([os.path.expanduser(script_path)])
    return "Success"

if __name__ == "__main__":
    app.run(host='0.0.0.0')
In the code above a new Flask app is created, with one endpoint which handles POST requests to our webhook URL. In the handler a simple shell script is called (living in the home dir of the running user) which is what actually runs jekyll build.
The contents of the jekyll_rebuild.sh script simply pulls the latest changes from the Git repo, rebuilds the site and copies the static files to the folder served by the web server - /var/www/html in this case:
#!/bin/bash

echo "Pulling latest from Git"
cd ~/blog/ && git pull origin master

echo "Building Jekyll Site";
jekyll build --source ~/blog/ --destination ~/blog/_site/;
echo "Jekyll Site Built";

echo "Copying Site to /var/www/html/";
cp -rf ~/blog/_site/* /var/www/html/;
echo "Site Rebuilt Successfully";
And that’s pretty much it. Just run the Flask web server via python3 refresh.py. By default Flask runs on port 5000, so you might need to either open up a port on your server (and update the webhook url) or proxy it through Apache/Nginx.
You could also integrate Elastic Jekyll into this process to give your site full-text search via ElasticSearch that gets automatically updated as you add new content!