Search Icon

Ryan Harrison My blog, portfolio and technology related ramblings

Oracle Cloud - Setting up a Server on the "Always Free" Tier

So it turns out that Oracle Cloud (OCI) offers an extremely generous free tier, and not many people seem to know about it. Beyond the 30 day free trial, which gives you $300 worth of free credits to use (not bad at all), they also offer a pretty substantial amount of infrastructure in their Always Free tier as well. In terms of server (VPS) infrastructure, this includes (at the time of writing at least):

  • 2 AMD based Compute VMs with 1 vCPU (x86) and 1 GB memory each + 0.48Gbps max network bandwidth
  • 4 Arm-based Ampere A1 cores and 24 GB of memory usable as up to 4 VMs + 4GBps max network bandwidth
  • 2 Block Volumes Storage - 200 GB total
  • 10 GB Object Storage – Standard + 10GB Object Storage Infrequent Acccess + 10GB Archive Storage
  • Outbound Data Transfer -10 TB per month

Now, whatever you may think of Oracle in general, you can’t deny that this is a good deal. You can in theory set up a max of 6 VPS instances, all for free, on a commerical cloud environment. Even if the setup process might be a bit awkward compared to other providers, you can’t really complain too much. You would be spending a fairly significant amount on the equivalent amount of infrastruture from elsewhere like AWS or DigitalOcean.

In the rest of this post I will quickly run through the steps to setup a small VPS server running Nginx on the free Oracle Cloud tier. This is a standard VPS, just like you would find anywhere else, running Ubuntu Server 22.04. A Terraform provider is also available if you wanted, but for simplicity I will go through the web console.

Create an “Always Free” Oracle Cloud Account

Go to https://www.oracle.com/uk/cloud/free/#always-free and create an account as usual. You will have to provide credit card information (I presume to prevent misuse), but won’t be charged. For the first 30 days you will be able to play with $300 of credit if you want to, but after that time is up your account will revert automatically to the Always Free tier.

Oracle Free Tier Main Page

Create an Instance

Once signed in, select the Instances option on the main dashboard (yes the console isn’t the best for navigation). You should be presented with the following screen which will show all active instances. You can see that I’ve created a couple already:
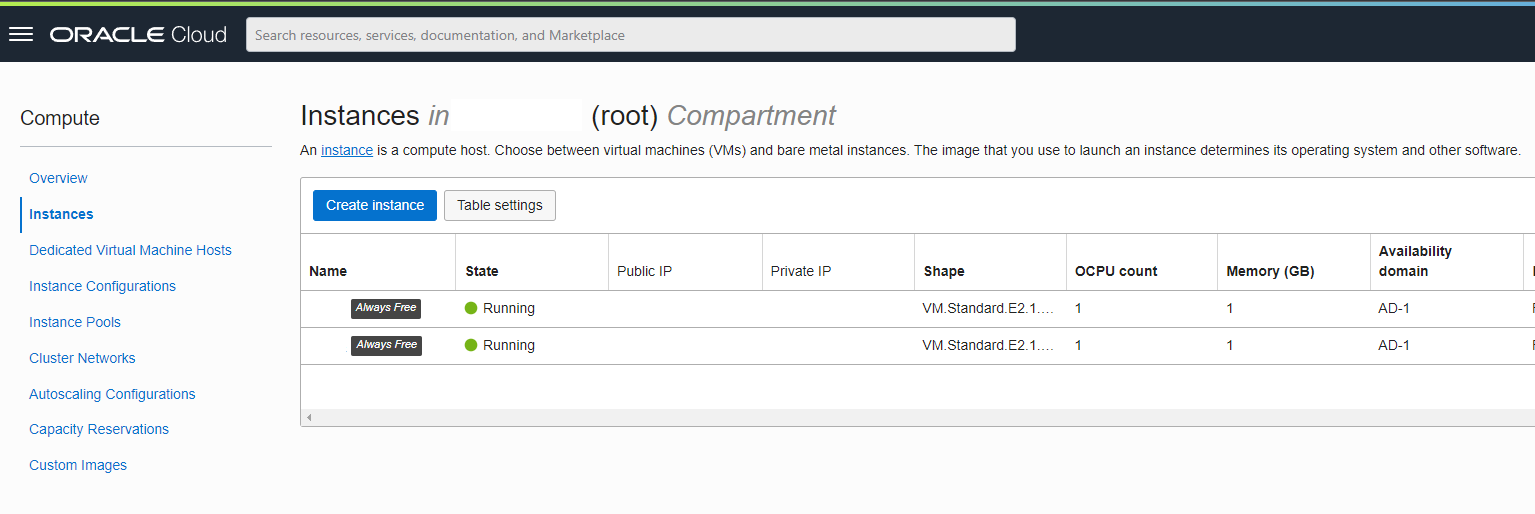
Oracle Cloud Instances Dashboard

Click on the Create Instance button to create a new VM. This is the standard VPS configuration/settings page:

  • Placement - controls which AZ the server is deployed to. Can be kept at default to let OCI choose the best. It should be noted that I’m also creating instances directly in the UK (London) region which is great for latency
  • Security - keep as default
  • Image and Shape - select the Image and type of server (amount of resources) you wish to deploy:

For this example we will go with Ubuntu Server 22.04 minimal as our OS. It works great on the limited amounts of CPU and RAM on these nodes as it unbundles a lot of of the default packages that you probably don’t need anyway (you can get them back if you need).
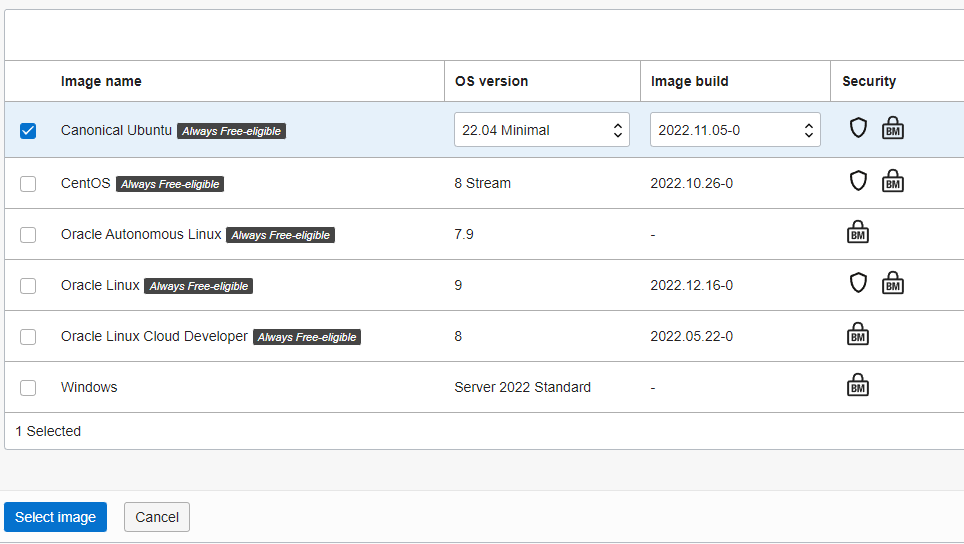
Oracle Cloud OS Selection

For shape, you can choose between AMD (2.0 GHz AMD EPY 7551 x86) vs ARM based (Ampere) CPU’s. You are limited to 1GB RAM max on the AMD shapes (makes sense since they are more expensive), but up to 24GB on the ARM cores. You get a max of 4Gbps of bandwidth on those ARM boxes well, which is very impressive for a free offering (though I haven’t benchmarked what you actually get). Here we will go with anAmpere based VM with 2 vCores and 6GB of memory (did I mention already that all this is free?):
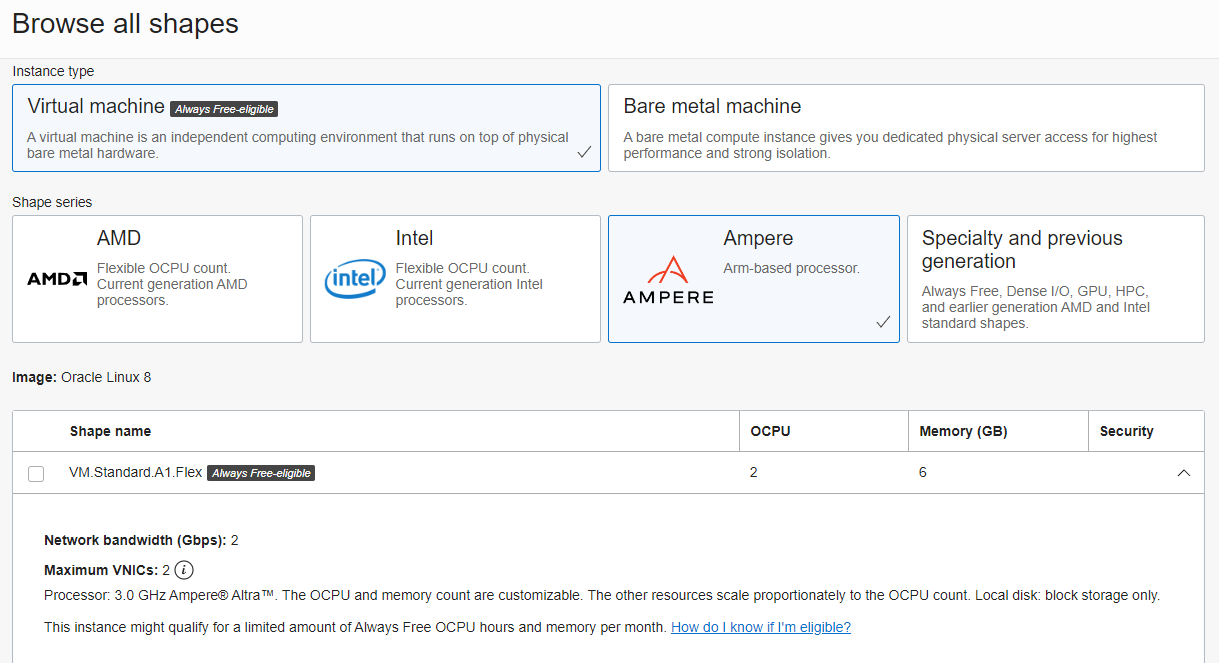
Oracle Cloud Shape Selection

  • Networking - can keep these as default to use your default root Virtual cloud network and subnet. Also make sure the option is checked to assign a public IPv4 address to your instance
  • Boot Volume - by default you will get a 50GB volume. You can increase this if you want to, up the max of 200GB allowed in the free tier

Create an SSH Key

In the Add SSH Keys section you can choose to automatically generate a keypair, but I prefer to create my own. There are plenty of tools for this, for now I will use PuttyGen to create a new Ed25519 keypair. Save both the private and public key locally for use later as usual. Don’t worry I’m not using this key
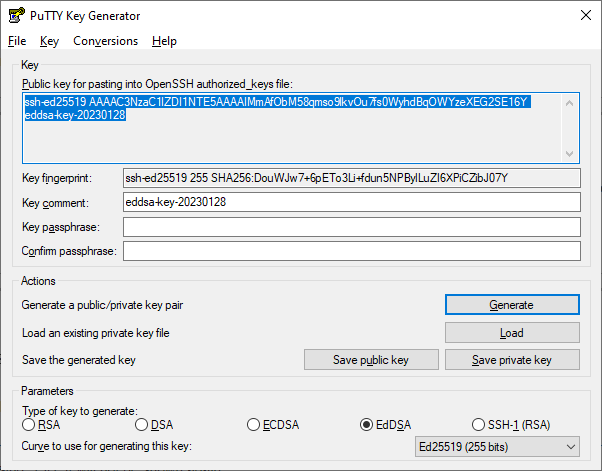
PuttyGen Key Creation

Then paste the public key into the corresponding box in the console. Oracle Cloud (OCI) will inject this public key into the .ssh/authorized_keys file for the main ubuntu user on the new VPS instance, thus allowing you to login through SSH.

Oracle Cloud Add SSH Keys

You can look through the other configuration options as needed, but that should be good enough for now. Press Create and wait a couple minutes for the instance to be created. Startup times seem pretty reasonable on Oracle Cloud.
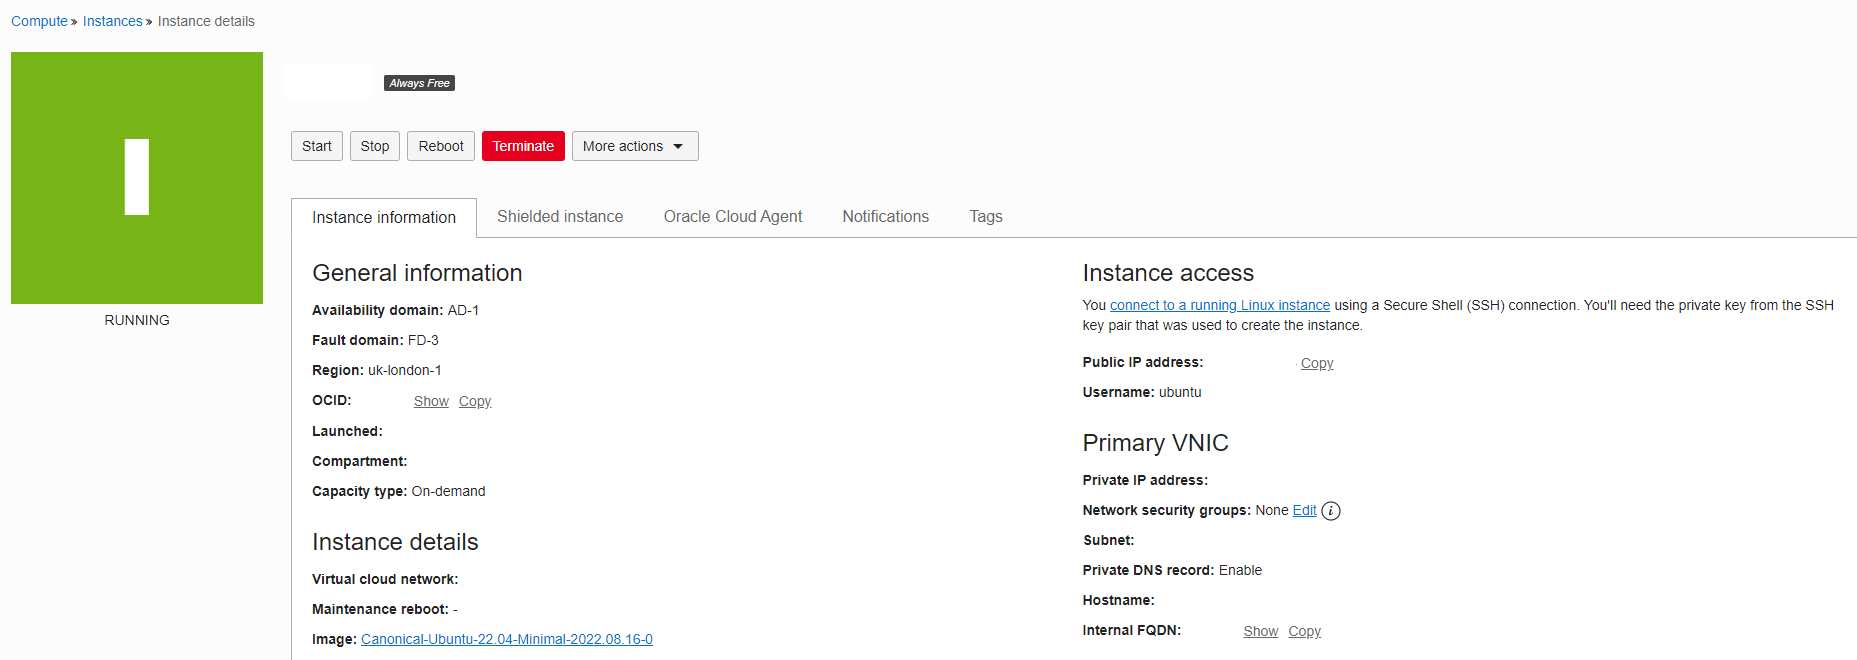
Oracle Cloud Instance Status Page

Update the default Security Group

As you might expect, by default the security group (or security list in Oracle Cloud) will block all traffic coming into your server by default apart from port 22 for SSH. This is good, but as we want to setup an Nginx web server on ours, we need to add a couple new ingress rules.

In the Virtual Cloud Networks section, navigate into your default VCN which was created by default. On the left, select the Security Lists option. There should be a single default entry for the VCN. Here we will add two new Ingress rules for port 80 and port 443. It should look something like the following after the changes:
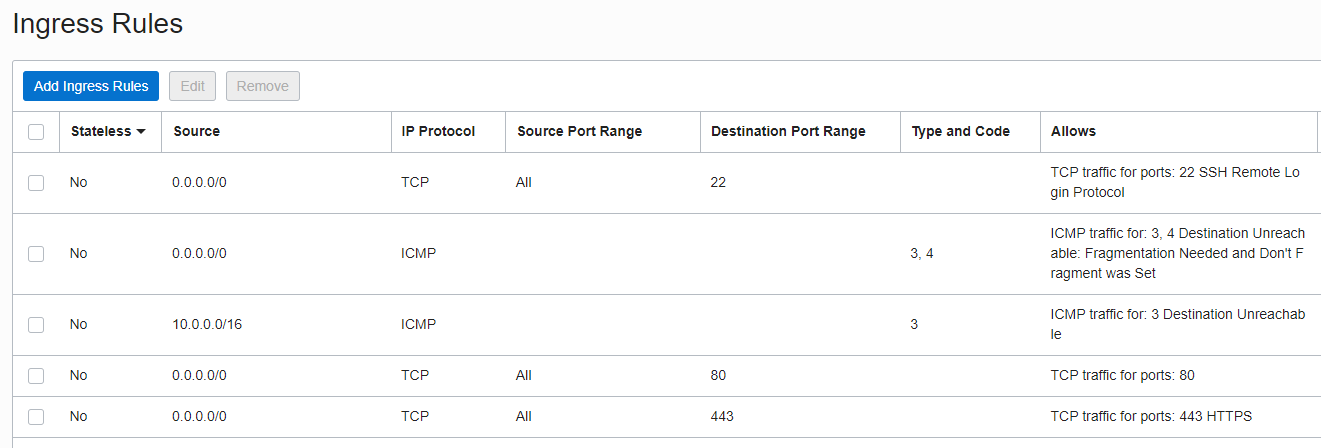
Oracle Cloud Ingress Rules

Login to the Instance

Now all that needs to be done is to login to the instance using your private key saved from earlier. The default user is called ubuntu so if using standard ssh commands then something like ssh -i /path/to/private/key ubuntu@ipaddresss should get you in.

The ubuntu user has sudo access by default, so you can now start installing packages and using the instance for whatever you need.

Follow my other guide posts on how to setup an Ubuntu Server instance from scratch. For now we can just install Nginx to see our server running: sudo apt install nginx and sudo systemctl status nginx to check that it’s running.

Configuring iptables

One thing that might cause issues is the fact that the Oracle Ubuntu image sets up an iptables rule to block all traffic by default (ufw is not installed). That means if you had an Nginx server running, you won’t be able to ping it using the public IPV4 address unless you open up access on the ports. This seems a strange choice considering this is also controlled by the security group, but extra layers can’t hurt I guess.

To allow access on ports 80 and 443 for a standard web server with HTTPS enabled, run the following commands:

sudo iptables -I INPUT 6 -m state --state NEW -p tcp --dport 80 -j ACCEPT
sudo netfilter-persistent save
sudo iptables -I INPUT 6 -m state --state NEW -p tcp --dport 443 -j ACCEPT
sudo netfilter-persistent save

If you now navigate to the public IPv4 address in a browser, you should see the standard Nginx welcome page:
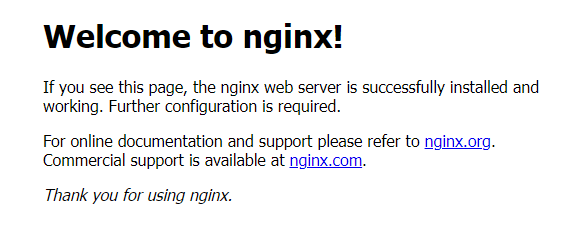
Nginx Welcome Page

That about wraps up the setup process for this post. As I said, the Oracle Cloud free tier is extremely generous in terms of the sheer amount of infastructure you can provision. Plus, it operates just like the others big players as a proper commerical cloud offering, so uptime, network performance and integration with the general infra tooling should work out of the box.

Read More

Kafka vs MQ

Some quick high levels notes on Kafka vs MQ. This is a question that often gets asked by folks already who are familiar with traditional queues (IBM MQ/RabbitMQ etc) when they are introduced to the world of Kafka:

Kafka High Level Uses

  • Event input buffer for data analytics/ML
  • Event driven microservices
  • Bridge to cloud-native apps

ActiveMQ

  • Consumer gets pushed certain number of message by broker depending on prefetch
  • Consumer chunks through them, on each ack, broker deletes from data store
  • Produce pushes single message, consumer acks, deletes, gone 1to1
  • Conforms to standard JMS based messaging

Topics in MQ

  • Subscribers only receive messages published while it is connected
  • Or durable where client can disconnect and still receive messages after
  • In MQ can block brokers, fill data stores
  • Each consumer gets copy of the message unless composite destinations/message groups
  • Hard to create dynamic consumers or change the topology

Kafka

  • each group gets message, but in group only one consumer
  • consumers defines the interaction (pull)
    • partitions assignment, offset resets, consumer group
  • consumer can apply backpressure or rebalance

  • Can’t go back through the log
  • Difficult to load balance effectively
  • Completing consumers vs one partition still processing whilst other is blocked
  • Hard to change topology or increase number of queues
  • Hard to handle slow/failing consumers
  • not predefining functionality to behave like a queue or topic, defined by consumers
    • introduce new consumer groups adhoc to change how destination functions
    • single consumer group = queue
    • multi consumer groups = topic
    • what offset to start from
  • one consumer group can fail and replay whilst another succeeds
  • MQ always queue one out at a time - not depending on consumers, Kafka behaviour changes on number of partitions/consumers
Read More

Kafka Recommendations & Best Practices

Most Kafka design and configuration choices are use case dependent and come with trade-offs, so it’s hard to define any best usage rules. However, below are some points of interest and general recommendations based on previous experience that you may want to consider or look more into:

Topics

  • Ensure all topics have a consistent naming scheme. If using a shared cluster, prefix with the system name. Kafka can have issues when there are both underscores _ and periods . in the topic name, so choose one or the other as a common separator
  • Determine the number of partitions the new topic should have, taking into account:
    • volume of data - more partitions increases the upper-bound on the number of concurrent consumers processing messages
    • it is easier to add new partitions to an existing topic in the future rather than remove partitions if there are too many already
    • during a rebalance, all consumers will stop and be reassigned new partitions. If there are too many partitions/consumers then this can be slower process to coordinate and redistribute and may cause additional stress on the cluster. Don’t set the partition count too high as there are side effects
    • as a general rule of thumb, keep the number of partitions an easily and evenly divisible by your expected number of consumers e.g having 12 partitions will evenly spread load across 3 or 4 consumers subscribed to it and processing messages in parallel
  • How long data on the topics should be kept in the cluster (retention) - as small as possible. For shared clusters this will be a max of 7 days in order to support the cluster being completely rebuilt over the weekend. Retention can be set on a per topic basis as needed
  • The topic replication factor will be likely be determined by the existing cluster configuration to ensure message durability. Likly will be set to 3 or 4 to survive broker failure or complete data centre failover
  • Don’t set compression at the topic level, prefer at the producer level. Look into other topic level configuration properties such as compaction as needed depending on specific use case
  • What the key of the topic will be depending on partitioning and source data - remember all messages with the same key will be sent to the same partition
  • What the value POJO should be - see below for more details

Messages

  • When creating a key, take into account data skew on the broker and partitions - ideally there will be even distribution between them all. Otherwise you may see issues if one consumer is processing all the messages with the others sitting idle
    • if not key is provided, the cluster will use a round-robin approach to distribute messages - this is better than having a bad custom key
    • the key should contain data elements with high cardinality to increase the probability of good data distribution (based on hashes)
    • Do not include variable data elements in keys (e.g version numbers). The overall id is a good key property for example as it means all versions of that event will be sent to the same partition. There is no ordering guarantee across partitions so if you need one message to be processed after another, they must have the same key
  • Use strongly typed keys and values on topic - don’t use Strings as its harder to manage deserialization and versioning
  • Consider using a message wrapper to add metadata fields to all messages (or use headers)
    • adds a number of fields to better support tracking across services source instance, cause, origin, run/batch UUID and unique message id’s
  • If the topic is to consume very high volumes of data, then try to avoid unnecessary duplication or large objects which are not needed to improve throughput and network traffic
  • Consider changes to the format of the messages over time e.g adding or removing fields
    • this has to be synced between producers/consumers to ensure the messages can still be deserialized properly
    • it is also a reason to use short retention periods and consumers will not need to process very old messages
    • consider looking into Avro and schema registry to better manage this aspect

Producers

  • If your project is Spring based, use the provided KafkaTemplate classs which wraps the Apache producer and makes config/sending messages much easier
  • Specify acks=all in the producer configuration to force the partition leader to replicate messages to a certain number of followers (depending on min-insync replias) before ack’ing the messages and received
    • this will increase latency between sending and receiving ack, but otherwise you may lose messages if a broker goes down and the message has not been replicated yet
    • KafkaTemplate operates in an sync manner by default, so call .get() on returned future to block until ack is complete
  • Enable the idempotence property on the producer to esnure that the same message doesn’t get sent twice under some error conditions (adds tracking ids to the message to prevent duplicates). Note that depending on use case and consumer behaviour this may not be needed. Be aware that this also overrides other producer configs such as retries (infinite) and max inflight requests
  • Performance at the producer level is mainly driven by efficient micro-batching of messages
    • batch size and linger.ms can set to delay sending until the producer has more messages to include in the batch
    • this is a balancing act as increasing these will add higher latency to message delivery, but give more overall throughput
  • Consider setting compression on the producer to improve throughout and reduce load on storage, but might not be suitable for very low latency apps as introduces a decompression cost on the consumer side. It is not recommended to add this to the topic level which will cause the cluster to perform compression on the broker instead of the producer

Consumers

  • If your project is Spring based, use the KafkaListener and KafkaListenerContainerFactory classes to greatly simplify the otherwise complicated setup of the core Apache consumer classes and adds inegrations with other aspects of Spring Boot
    • makes setting deserializers, concurrency, error handling etc easier
  • Kafka only provides ordering guarantees for messages in the same partition, so if your consumer needs to see one message after another, they must have the same key
    • even then rebalancing may cause disturbances in this behaviour
  • To scale consumption, place consumers into he same consumer group to evenly spread partitions between instances
  • If the same listener is subscribed to multiple topics, it is recommended to place them in different consumer groups, otherwise rebalancing will impact processing in all when not necessary
  • Improve throughput by configuring min bytes and max wait times for batching - again this is a balancing act of throughput vs latency
  • Ensure all consumers are idempotent (able to consume the same message multiple times without any negative impact)
    • Kafka has a number of ways to try and combat duplication, but it is strongly recommended to place checks in all consumers as this is still never guaranteed from Kafka
    • Sending offset acknowledgements are a balancing act between at-least-once and at-most-once processing - the former being preferable in most cases
  • Ensure that consumer lag (difference in rate of production vs consumption) is properly traced via monitoring tools to detect general issues or slow consumers
  • By default Kafka will auto-commit offsets as a specific interval, but this alone introduces risk of data loss (commits ofsset before fully processed vs processed before committing offset and then crashing)
    • Is is strongly recommended to disable auto commit and manage offset commits at the application level
    • You can process on message at a time and then sync commit the offset after processing is complete -safest approach but more network traffic as less offset batching
    • Process the messages as a batch in your service code and then sync commit all the offsets at the end - more throughput but more chance of duplicated effort
    • By making all consumers idempotent, these concerns are removed entirely as long as the offsets are committed after processing is completed

Error Handling

  • Ensure that all exception scenarios are thought about and handled (deserialization, delivery failure, listener failure, broker down, timeouts, transient issues, error topic publish etc) and alerts are raised when necessary (but ideally the system should be able to recover itself from many of these problems)
  • Avoid creating configuration/consumers/producers manually, use factory methods in a core lib which should come setup already for error handling in a a consistent manner

Kafka Spring Consumer

  • There are a number of techniques to handle errors when consuming topics depending on use case - pausing the consumer, raise alerts and continue, error topics etc
  • A common approach is for each topic to have associated error topics (suffix .error app exceptions and .deserr for deserialization exceptions). Messages are automatically forwarded to these error topics when corresponding exceptions are thrown
    • Error topics always have just one topic to maintain message order over time
    • If the deserializer fails to convert your JSON to the corresponding POJO, the message will be placed immediately on the .deserr error topic and an alert raised (no point in retries)
    • Key and value will be String versions of the original record to cover format issues
    • Headers of the message include specific exception details including the origin offset and partition and a stacktrace - very useful for debugging
    • If error topic publication fails, the record is not acknowledged and the container paused + an alert is generated - signals the cluster is likely having issues
    • Take into account the multiple consumer groups may be processing messages from the same topic - include the consumer group name in the error topic name
  • If message fails during processing within a listener (general app exception)
    • Can retry processing multiple times to cover transient issues - be careful about duplicating work
    • If an exception is still thrown when processing the same message (app level issue such as db connection) then the message(s) are placed on the .error topic and the offsets are committed to continue consuming the next messages
    • Headers of the message include exception details and stacktrace just like deserialization errors
  • Ensure monitoring is in place to detach any depth on error topics
    • Likely resolution will be to reflow the messages after the underlying issue resolved - making consumer idempotent is very important here
  • Ensure transactionality is setup to rollback other changes (db) if the consumer fails

Kafka Spring Producer

  • All producers require ack from all broker replicas before committing. By default this is set to ‘all’ meaning that before proceeding a number of brokers need to ack all the messages - as defined by the min-insync-replicas config property at the broker level
  • If using KafkaTemplate make sure to call .get() on the future to block until the ack is received (by default it will continue immediately and you may not know about the issue). With this behaviour an exception will be thrown as you would expect if the production fails
  • Ensure transactionality is setup to rollback changes if errors occur - pullback messages sent to other topics etc

Kafka Streams

  • Similarly to general consumer error handling, but as Kafka streams spolits work into a number of parallel stream tasks, is a lot harder to manage centrally
  • Specify a deserialization exception handler - similar to Spring consumers, to publish messages onto error topic automatically if a record cannot be deserialized. Stream will move onto the next record
    • Create all Serde’s using builders to setup deserializers consistently and ensure handlers are included by default
  • All potential exceptions must be handled within each stream task (map/filter etc) - if an exception is not caught it will crash the streams thread and force a rebalancing
    • default exception handlers will just log the error and continue
    • could wrap all operations in try/catch and handle accordingly
    • or could wrap the base KStream/KTable etc to give consistent error handling and avoid duplicated code - ‘protected’ versions
  • If streams thread does do for some reason, an uncaught exception handler should be provided to generate a critiical alert. If all the streams threads die (potentially by all trying to process the same message), nothing will be consumed at all and the app will be stalled
  • Ensure monitoring is in place to ensure that the streams app as a whole is live and healthy

Misc

  • Although during local development you could directly connect to the main dev cluster, it is recommended for devs to instead create and use their own local clusters
    • this gives a lot more control during dev for debugging/modifying properties without impacting others
    • any new topic can be created or invalid messages sent without also being seent/consumed by the main services and causing unnecessary exceptions and alerts
  • Maintain clear documentation behind the reasons behind each topic and the config behind them - volume expectations etc
  • Create a Kafka topology diagram showing clearly the path(s) taken by messages between components - this is especially important the more services and topics are created
  • Create documentation showing exactly what keys/values are put onto each topic - useful for debugging and new joiners
  • Ensure all Kafka configuration for new producers/consumers is done in a single central place (likely a shared lib) to avoid duplication and chance of issues if placed everywhere
    • list of broker hosts per environment, properties for Kerberos and auth etc
    • maintain consistency in configuration for all producers/consumers regardless of where they are used - serialization, error handling, transactions etc
  • Ensure you have the appropriate disaster recovery plans in place to either recover from the cluster being down or failover
    • Kafka is not meant as a data store, although unlikely plan for all the data to be lost at any point
    • Determine how the application should react if the cluster is not available - brokers being down or transient network issues
Read More

Kafka Command Cheat Sheet

Environment Variables

Set path to binaries

export JAVA_HOME=/path/to/jdk

export PATH=$PATH:/path/to/kafka/common/bin

Add Kerberos / SASL config options (if required)

export KAFKA_OPTS="-Djava.security.krb5.conf/etc/krb5.conf -Dzookeeper.sasl.client.username=myuser -Djava.security.auth.login.config=/var/tmp/jaas.conf"

export KCONFIG=/var/tmp/kafka-client.properties

Where properties contains:

security.protocol=SASL_PLAINTEXT
sasl.mechanism=GSSAPI
sasl.kerberos.service.name=myuser

Set common broker lists

export KBROKER=host:9092

export ZBROKER=host:2181


Topics

Create a new topic

kafka-topics.sh --zookeeper $ZBROKER --create --replication-factor 3 --partitions 4 --topic topic1

Describe an existing topic

kafka-topics.sh --zookeeper $ZBROKER --describe --topic topic1

List all topics in the cluster

kafka-topics.sh --zookeeper $ZBROKER --list

Delete a topic

kafka-topics.sh --zookeeper $ZBROKER --delete --topic topic1.*

Alter topic configuration

kafka-configs.sh --zookeeper $ZBROKER --alter --entity-type topics --entity-name topic1 --add-config retention.ms=2592000000


Consumers

Run a console consumer starting from the beginning of a topic

kafka-console-consumer.sh --bootstrap-server $KBROKER --topic topic1 --from-beginning --consumer-config $KCONFIG

Consumer which prints key and value for each message

kafka-console-consumer.sh --bootstrap-server $KBROKER --topic topic1 --from-beginning --property print.key=true --property key.separator="|" --consumer-config $KCONFIG

Create a consumer inside a specific group

kafka-console-consumer.sh --bootstrap-server $KBROKER --topic topic1 --group group1 --consumer-config $KCONFIG


Producers

Run a console producer pushing to a specific topic

kafka-console-producer.sh --broker-list $KBROKER --topic topic1 --producer-config $KCONFIG

Include a specific key in each published message

kafka-console-producer.sh --broker-list $KBROKER --topic topic1 --property "parse.key=true" --property "key.separator=|" --producer-config $KCONFIG


Consumer Groups

List all consumer groups in the cluster

kafka-consumer-groups.sh --bootstrap-server $KBROKER --list --command-config $KCONFIG

Describe offsets and status of a consumer group

kafka-consumer-groups.sh --bootstrap-server $KBROKER --group group1 --describe --command-config $KCONFIG

Delete a consumer group

kafka-consumer-groups.sh --bootstrap-server $KBROKER --group group1 --delete --command-config $KCONFIG

Reset offsets to the beginning for all topics

kafka-consumer-groups.sh --bootstrap-server $KBROKER --group group1 --reset-offsets --to-earliest --all-topics --execute --command-config $KCONFIG

Reset offsets to beginning for a specific topic

kafka-consumer-groups.sh --bootstrap-server $KBROKER --group group1 --reset-offsets --to-earliest --topic topic1 --execute --command-config $KCONFIG

Reset offsets to latest

kafka-consumer-groups.sh --bootstrap-server $KBROKER --group group1 --reset-offsets --to-latest --all-topics --execute --command-config $KCONFIG

Reset offsets to specific value

kafka-consumer-groups.sh --bootstrap-server $KBROKER --group group1 --reset-offsets --to-offset 10 --topic topic1:10 --execute --command-config $KCONFIG

Reset offsets by a specific shift amount

kafka-consumer-groups.sh --bootstrap-server $KBROKER --group group1 --reset-offsets --shift-by -10 --topic topic1 --execute --command-config $KCONFIG


ACL’s

Grant superuser access to all topics and groups

kafka-acls.sh --authorizer-properties zookeeper.connect=$ZBROKER --add --allow-principal User:myuser --operation ALL --topic '*' --group '*' --cluster


Zookeeper

Connect to the Zookeeper cluster

zookeeper-shell.sh $ZHOST:$ZPORT

Set Zookeeper ACL for superuser

ls /
setAcl / sasl:myuser:cdrqa,world:anyone:r
getAcl /

https://medium.com/@TimvanBaarsen/apache-kafka-cli-commands-cheat-sheet-a6f06eac01b

https://docs.cloudera.com/documentation/enterprise/6/6.3/topics/kafka_admin_cli.html

Read More

Ubuntu Server Setup Part 10 - Install Docker and Docker Compose

It’s likely that you will want to run containers of some kind on your server, for that we’ll be installing and using Docker. This consists of a couple different parts - the Docker Engine itself which runs in the background as a daemon process, the docker CLI commands which allow you to interact with the Engine, and finally docker-compose which is another tool for easily managing multiple containers. On Ubuntu based machines the recommended way of installation is to use the official Docker repository.

Install Prerequisites and Set Up the Repository

Before we do anything more, update your local apt repositories and install a few prerequisite packages which are required in later steps:

$ sudo apt-get update

$ sudo apt-get install ca-certificates curl gnupg

Next, we need to add the official GPG key provided by Docker for their repository:

$ curl -fsSL https://download.docker.com/linux/ubuntu/gpg | sudo gpg --dearmor -o /usr/share/keyrings/docker-archive-keyring.gpg

Finally, we can add the official Docker repository, specifying that the releases must be signed by the GPG key we downloaded in the previous step. The command below will point to the stable repository, but you can use the nightly or test channels if you prefer:

$ echo "deb [arch=$(dpkg --print-architecture) signed-by=/usr/share/keyrings/docker-archive-keyring.gpg] https://download.docker.com/linux/ubuntu $(lsb_release -cs) stable" | sudo tee /etc/apt/sources.list.d/docker.list > /dev/null

Install Docker

Now we have the Docker repository and keys setup, we can pull down the latest packages again and directly install Docker directly through apt:

$ sudo apt-get update

$ sudo apt-get install docker-ce docker-ce-cli containerd.io

If everything completed successfully you should now have Docker Engine running in the background and the ability to run the docker CLI commands to run and manage images/containers. To verify things are working correctly, start an instance of the hello-world image:

$ sudo docker run hello-world

More details at https://docs.docker.com/engine/install/ubuntu/

Configuration Tips

Run Docker CLI as a non-root user

You may have noticed in the verify step above that we had to invoke the docker run command as root in order to successfully run a new container. This is required since the Docker daemon always runs as the root user and it binds to a Unix socket which is also owned by root. This is quite painful when interacting with the CLI however, so there is a workaround using groups:

# add a new group called 'docker' (it might already exist)
$ sudo groupadd docker

# add the current user to the docker group
$ sudo usermod -aG docker $USER

# after logging out and back in again you should be able to run docker without sudo
$ docker run hello-world

Note that this is not the same as running the daemon itself as a non-root user, so all the same security implications still remain when running containers.

Run Docker on startup

By default the daemon processes required to interact with Docker are not configured to start when the system boots. To rectify this we can instruct systemd to automatically start them for us:

$ sudo systemctl enable docker.service
$ sudo systemctl enable containerd.service

More details at https://docs.docker.com/engine/install/linux-postinstall/

Install Docker Compose

For reasons I don’t fully understand docker-compose doesn’t ship with the core Docker packages and so requires an extra installation step. Fortunately, it’s just a single binary so we can just directly download it into a location within the current PATH and start using it:

# download the latest release binary (replace the version from https://github.com/docker/compose/releases)
$ sudo curl -L "https://github.com/docker/compose/releases/download/v2.2.3/docker-compose-$(uname -s)-$(uname -m)" -o /usr/local/bin/docker-compose

# add execute permissions
$ sudo chmod +x /usr/local/bin/docker-compose

# verify everything is working
$ docker-compose --version
Docker Compose version v2.2.3

More details at https://github.com/docker/compose

Read More